social distanced networking

So, now being a month into social distancing, it turns out that I’ve have plenty of time to enact some changes that I’ve been wanting to put into place. However, I then haven’t put in the time to actually write about said changes. Today, I correct that oversight, but perhaps not in precise chronological order.

Some aspects of my challenges with my lab have stemmed from the fact that my network was a hodge podge of intentions and compromises that I didn’t have time to go back and fix. The fact that my wife, 3 children, and myself would all need to be at home working and using the Internet from all over the house, I finally had real motivation. Well, that and the fact that I was starting to experience intermittent wireless connection drops and general technical gremlins in the system. Therefore, I undertook the full and complete home and lab network redesign that I really need to do from the start.

Ubiquiti Network in Boxes
Where does he get all those wonderful toys…

In short…

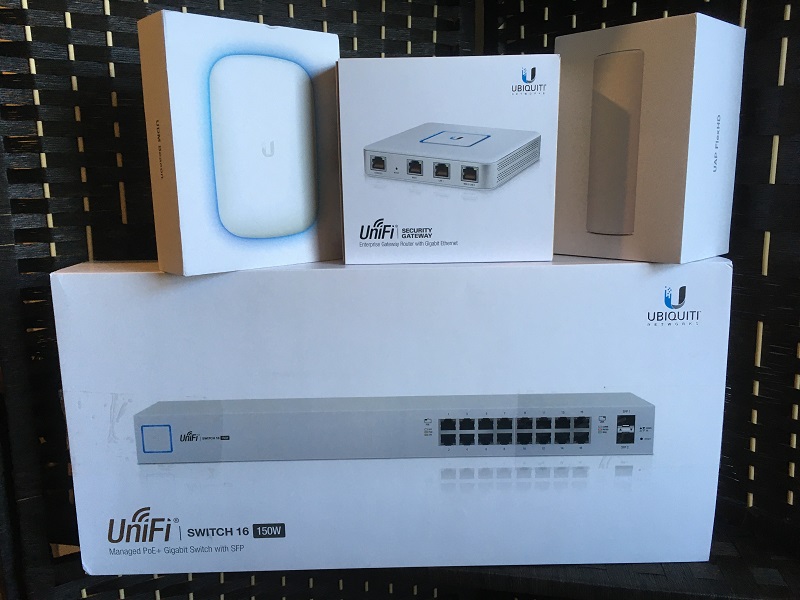
  • UniFi Security Gateway – – Replaces the firewall, gateway, and management functions that my old Buffalo AirStation served
  • UniFi Switch 16 150W – – Replaces the Cisco SG200-16
  • UniFi FlexHD and BeaconHD – – Replaces the wireless functions of the Buffalo AirStation, with the added benefit of extending the range via wireless mesh technology.

The improvements to the wireless were mostly for general home use, to ensure that we had much better coverage around the house. The added benefit was that the extended range increased signal strength in my office. For the lab, the changes made it much easier for me to implement the VLANs that I originally intended to use for dividing up the network traffic. I can’t say enough positive things about how easy it was to configure the VLANs. Basically all I had to do was define the network with a subnet CIDR and some options about routing, then pick the device and/or port where I wanted the network associated. In the end, here is a diagram of how I adjusted the network for the lab.

Lab Network v2 diagram
Simplified, but with more control and better routing…

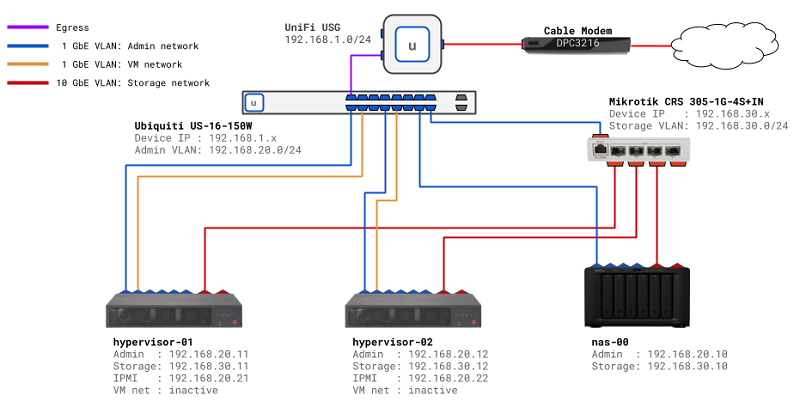
In fact, setting up VLANs was so easy and useful, I ended up creating multiple VLANs to divide up the network traffic for other areas of the house. First, I created a VLAN to segregate the primary 5G and 2G wireless networks used in the house. Then I also created a separate VLAN for my wired media devices (e.g. Roku TV, game consoles), and included an additional wireless network in the VLAN. The reason for the shared wired/wireless media VLAN was because I wanted to be able to connect to my Xbox One with the mobile app on my phone; apparently, they needed to be on the same subnet to work.

Ultimately, I was able to re-purpose my old network CIDR block to only be used for the lab, setup the storage network as a proper VLAN, and rearrange my home devices. I now have better wireless coverage, central management of my entire network, and more consistent network performance. It took me the better part of a day to re-route cables, swap out equipment, and generally get the house and lab back up and running… but it was definitely worth the effort.

Next time, we’ll get back to how the hypervisor rebuilds went and what’s next on the project list.

lab rework ahead – part 1

It has been nearly a year since my last update, and the only excuse is truly that I have been busy and the lab setup has needed some fine tuning. When last we visited the environment, I talked about how the network configuration I intended to use was not going to work. The rule of the day that won out was simplification over isolation, and overall that setup has worked well for me to date. Today, we’ll be diving into what the lab has been used for over this past year and what needs to change.

The original intent of this home computing lab was to be able to tinker with virtualization, cloud and container platforms with some automation thrown in for good measure. These are all things I work with daily as part of my job. Ultimately, the main platform for the lab needed to be some form of virtualization, which would then allow me to spin up virtual machine servers for everything else I need to test. Since I work for Red Hat and one of the software products I need to work with is Red Hat Virtualization (based on the upstream oVirt project), that’s what I decided to build.

Originally, the physical servers were both running Red Hat Enterprise Linux 7.5 (RHEL), with one configured to provide DNS services for my private lab domain. For the DNS services I chose to use BIND, with the servers setup in a master/slave configuration. While running my own DNS might seem like just some extra nerdy fun, it’s actually a requirement to have fully qualified and resolvable DNS names for Red Hat Virtualization (RHV). As for the original virtualization setup, RHV 4.2 was deployed in self-hosted engine mode with 3 separate networks (mgmt, VM traffic, and storage). In short, self-hosted means that the management engine is configured and then deployed as a virtual machine on the virtualization platform itself. This setup does introduce some complexity, but the benefit is that the manager can move between the two servers. Also, perhaps more important for this environment, it means that I didn’t have to commit one server entirely to acting as manager (and thus, eliminating half my virtualized capacity). The piece that makes the movable manager possible, and also allows for VM migration/movement, is the external storage. On my Synology NAS, I setup 3 storage volumes and made them avaiable via NFS v4 on the 10 Gbps network in the lab. The volumes are for storing the RHV manager data, other virtual machine disks, and ISO images.

Now, that original lab environment worked great for quite some time, and to be honest I should have written about it before. For brevity, here’s a list of some of the testing, tasks, Ansible automation, and deployments I was able to accomplish using the lab :

  • Automated configuration of BIND
  • Automated initial server postinstall setup
    • Subscribe RHEL server
    • Enable/Disable repositories
    • Install all my preferred admin utilities
    • Update system software packages
  • Automated provisioning of VMs for OpenShift Container Platform 3.11
  • Developed my own bare minimum OpenShift Container Platform 3.11 cluster deployment configuration
  • Testing bare metal installation of OpenShift Container Platform 4.1
  • Upgraded Red Hat Virtualization 4.2 to 4.3 Beta, and 4.3 Beta to 4.3…

And… somewhere in that series of upgrades, I broke something. The short version: the default route started disappearing from the servers, which broke all outbound network access, which in turn made it extremely difficult and/or annoying to update packages and install software. At this point, my whole lab became unusable for my testing and I knew that I would need to completely rebuild it. The first phase I undertook was to wipe and reinstall the OS, and then I took some time to think about other changes I wanted to make. The new plan looked like this:

  • Red Hat Enterprise Linux 7.7
    • Initial setup with only 1 NIC configured
  • Red Hat Virtualization 4.3
    • Two-node self-hosted engine deployment
    • All network configuration done via RHV manager
    • Only 2 networks (mgmt and storage)
  • Red Hat Identity Management
    • Instead of configuring BIND, use IdM for DNS
    • Allow for quick testing of DNS changes via console

Since I am currently in the grips of social distancing, I have some extra time on my hands, so I plan on working on the lab and this site a bit more in the coming weeks. So, rather than post an epic length single post, I’ll pick up in the next post about the official rebuild and some other improvements I have in plan for the future.

more on networking

After an unintentional break from working on my lab, and writing about it, I figured today was a good time to jump back in and give a bit more insight into my networking woes that I mentioned in the last post. The short version is that the original design of my lab network was built upon incomplete knowledge of how VLANs work. As a reminder, below is the diagram I put together of this idealized network.

Network pipe dreams

So looking at the diagram and thinking about my implementation from the Cisco SG300 down, everything was actually setup correctly. I had the VLANs deployed and configured, and connectivity appeared to be working the way I intended across those VLANs. The problem was that in order to configure outbound Internet access through my home router (actually a BAS-N600-DD), the home router needed to be made aware of all the VLANs that I created. I did the research and found that my router actually does support VLANs, however the interface and CLI commands necessary to correctly set everything up was not exactly intuitive or confidence-inspiring for me. Additionally, I wasn’t sure exactly what the impact would be if I simply flipped things so that the BAS connected out through the SG300 (aside from the need for a new firewall). This lab does exist within my home after all, and I needed to ensure Internet access wasn’t extensively disrupted to the various devices in use throughout the house. I had the same concerns about attempting the VLAN configuration on the BAS, combined with the fact that I really didn’t want to deal with the the headache of potentially bricking the configuration (even though I did take a backup).

Right now all the networking is functional, but essentially everything is an extension of my BAS-600-DD network. To make things somewhat sane, I have a series of CIDR blocks that I manually reserve for the Admin, VM, and Storage networks. The BAS has DHCP service enabled, but I’ve configured it to only allocate addresses out of a small portion of the full CIDR block that it manages. A nice benefit of this setup is that any machines I spin up on the network automatically get an IP address, which I can then modify later if I want. I’m not happy with the setup overall, but as I said, it’s functional for now.

In my next post, I’ll move on from the physical infrastructure and get into my virtualization setup. Beyond detailing what I am using and how it’s deployed, I’ll lay out some of the plans I have for that space going forward.

base building

Despite numerous setbacks and failed attempts to bootstrap the heart of the lab, I was able to finally get things rolling over the weekend. As a quick review, I chose to use two SuperMicro SuperServer E300-8D machines as the core hardware due to their small footprint, quiet operation, low power consumption, and performance specs.

Each of the servers runs an Intel Xeon D-1518 processor, which has 4 cores, a 6MB cache and only draws 35W of power. Additionally, out of the box they can house one M.2 PCI-e SSD, one mSATA SSD, and one 2.5″ SATA drive. Currently, I’m only using the M.2 slot for an NVMe SSD, but in the future I could add an mSATA drive or expand with more M.2 via PCI-e expansion card. From a memory perspective, the E300-8D servers support up to 128GB of ECC registered RAM, so I went ahead and put the full 128GB in each. Essentially, the memory limit is what convinced me to use the SuperMicros instead of grabbing a pair of higher end Intel NUCs (max 32MB). Now, I could drone on about more technical specs, but pictures are often a lot more descriptive. To that end, I enlisted the help of my Star Lord POP! figure, mostly to provide scale… but also for the humor.

Star Lord, Legendary Outlaw, sizing up the SuperMicro E300-8D.

As you can see, the E300-8D has quite a small footprint overall. It’s basically a 1U rack height, but in terms of length/width it’s smaller than my 14″ ThinkPad. Also, I don’t believe I’ll ever run out of ethernet ports with these machines, there are six 1Gb ports, 2 10Gb SFP+ ports, and 1 port for IPMI. Otherwise, they are pretty basic with a VGA and two USB ports, but they are running headless now that they are bootstrapped anyway. I could have opted for using PXE boot, but for this first lab build I went simple and just plugged in a monitor, keyboard (with built-in touchpad and TrackPoint), and booted from a USB drive.

Compact layout, but plenty of power. He doesn’t know how this machine works.

Anyway, before getting to the operating system installation, I needed to install the hardware. Above is the “before” shot of the system opened up, and below is the “after” shot with all 4 memory slots loaded (left of the CPU/heatsink) and the M.2 NVMe installed (right of the CPU/heatsink). Of note, for future growth, to the right of the NVMe are the 2 PCI-e expansion slots and the mSATA slot (horizontal with white barcode sticker). You might also notice that this picture was taken with the originally attempted Western Digital Black NVMe.

RAM and NVMe drive installed… without any tape.

Before moving on, I want to quickly elaborate on what exactly happened with the WD Black NVMe drives. As I said in the last post, from all indications the drives appeared to be working: recognized in the BIOS, Red Hat Enterprise Linux (RHEL) installation detected them accurately, debugging with smartctl came back with a healthy status, but attempting to write out new partitions would completely fail. I even went so far as to try formatting the drives with a Windows 10 installer (idea from some online research, colleague input, and the fact that WD support indicated they only really supported Windows or Mac), but that ultimately failed as well. Trust me when I say, if there was a permutation of BIOS setting, manual formatting, automated partitioning, hardware re-seating, or operating system, then I tried it. In the end, I ordered a pair of Samsung 970 EVO Plus drives and once installed I was able to run through a minimal RHEL installation without any hitches. As far as I can tell, there must be some hardware or BIOS incompatibility between the SuperMicro motherboard and the WD Black NVMe drives (WDS250G2X0C – and likely also the 500GB model as well).

Two E300-8D servers powered up and networked next to the Synology DiskStation 1618+

With all the baseline installation work completed – including setting up the static IP addresses for the 3 NICs I will be using in each – the final step was to re-home the boxes down to my low-tech lab rack and wire them up. Above is the final (for now) configuration: network hardware sitting on the top, opportunistic use of the wire shelving for routing the ethernet cables, and the rest of the lab hardware (UPS, servers, NAS) on the second shelf. I do have a third empty shelf on the bottom, but I may use that for storing my electronics bins. One thing that I would change/improve if I were doing this again: mount the second shelf one slot higher to leave a little more slack in the network cables. The 3′ cables I chose worked fine, but extra slack would have allowed more options for routing them.

Close up of the simplified network cabling

Lastly, this close up shot of my currently network setup reveals my downfall. As it turns out, having a multiple VLANs on a switch (SG200) behind router (SG300) behind another router (N600-DD) was really cool, but complicated to get working properly. Put briefly: configuring it was easy, getting all the outbound Internet routing working was problematic. In an effort to just get everything up and running, I scrapped the complexity and am simply running everything in a single default VLAN. It would probably take another full post just to explain all the network roadblocks I ran into, discoveries I made, and what my plans are for the future. So, I will leave things as they are… functional, simple, and with more to come soon.

it’s the network

My original intention was to bootstrap the SuperMicros ahead of getting the network setup, but there have been some bumps in the road. It appears my originally chosen NVMe drives are somehow partially incompatible with my grand design. I say partially, because they show up and pass S.M.A.R.T. checks, but they seem to be immune, impervious, or allergic to partition table writes. My online research turned up a few cases of the WD Black NVMe drives being finicky with respect to Linux, and apparently not 100% compatible with the SuperMicro hardware/BIOS/something. Therefore, while waiting for alternative brand NVMe storage, I decided to tackle the network. (It also helped that all my cables arrived yesterday).

lab network diagram
The IPs are made up and the hostnames don’t matter…

Being that I am in no way a Network Engineer, there was a bit of a learning curve getting the first round of things rolling. My previous “router” and “switch” configuration has typically been relegated to the realm of things like DD-WRT for my wi-fi setup. That said, I have so far managed to get the Cisco SG300-10 configured as a Layer 3 router with 2 VLANs: the default admin network and an additional network for attaching the Cisco SG200-26 and MikroTik CRS305-1G-4S+IN. Additionally, I configured the routing rules on my DD-WRT wireless router so that I can get to all the lab subnets from my laptop. The final feat for the day was getting the MikroTik hooked up, configured as a Layer 2 switch, and routed properly.

As things stand now, I am able to pull up the administration consoles for both the SG300 and the MikroTik, all from my laptop and the comfort of my living room couch. Mission accomplished!

Tomorrow I should be able to get the SG200 wired up and configured with relatively little pain… I hope. If I have enough time, I might plug in the Synology and work on setting up my storage.

photo of SG300-10 and MikroTik CRS305
CyberPower UPS up and running, Cisco SG300-10 and MikroTik CRS305-1G-4S+IN online.

One last thing… For the record, I did consider flipping things around and having the SG300 be the primary router, with the wireless router being on a VLAN. However, that would have required a disruptive change to my existing home network, and it would also then require adding a new firewall of some sort. In the current configuration, I get to keep my home network functioning like it always has, and the lab is completely isolated so as to avoid my tinkering messing with home life.

the hardware cometh

Where does he get all those wonderful toys?!

Welcome to the first installment of my first big project for the site: my nerd-tastic journey to build an advanced home computing lab.

The primary purpose for assembling this technological terror is so that I will have easy access to a platform for testing out virtualization, cloud, container, and automation systems. Per my job, I do need to be able to tinker with OpenStack, OpenShift, Ansible, and KVM virtualization (and 2 of those really require hardware, otherwise I’d just stick with using AWS, Azure, and Google Cloud). Speaking of my job, a quick Internet shout-out to my co-workers for all their advice and input which helped me shape the final design (Chris, Rob, and Sean).

In the initial planning phase I spent an inordinate amount of time trying to balance between budget, performance, longevity, and power/noise requirements. Basically, I wanted to get the most performance that would last me a good while, without completely breaking the bank either in upfront costs or on-going electricity bills, and I wanted the whole setup to be insanely quiet. Ultimately, the bill of materials below is what I decided to use for the lab.

To summarize… The lab will consist of two SuperMicro E300-8D servers with 128GB of RAM and a 250GB NVMe local disk, which will serve as virtualization hypervisors. For additional storage, the Synology DiskStation will be primed with a little shy of 1.5TB worth of SSD and a dual 10Gb SFP+ adapter, which will allow the servers to access it over NFS through a dedicated 10Gb network. The servers have multiple Gigabit Ethernet ports, so each will connect to the SG200-26 switch for both an administration VLAN and a virtual machine traffic VLAN (the Synology will also have a connection to the administration VLAN). Also, since everything has enough onboard Gigabit NICs, I’m hoping to set up bonded pair NICs for the non-storage networks.

As of today, not all the hardware and cabling has arrived, but as the photo above shows, I have received a decent pile of kit so far… and I couldn’t hold off any longer. Since everything arrived that I needed for the Synology DiskStation, I decided to get the initial hardware setup out of the way.

Fresh out of the box, with 3 SSDs waiting to be installed
Final SSD ready to be slotted into place

The SSD installation was a piece of cake to complete, and it was basically 3 steps: remove drive bay, attach SSD via 4 screw mounting holes, slide drive bay back into place. I suppose the 4th step was to use the keys to lock the drive bay in place to avoid accidentally popping loose any of the in-use bays.

The dual SFP+ port PCI-e adapter
4 Gigabit ports and 2 newly installed SFP+ 10Gb ports

Installing the dual SFP+ PCI-e adapter card was a little more involved than I thought it was going to be, but not to imply that it was difficult. The way that the blank was held it place made it appear that it was something you could remove and slide the card in place. However, the process actually involved taking the cover off the DiskStation, seating the PCI-e card, securing via the supplied screw, and popping the cover back in place. So basically, the exact process you’d go through in a regular server or PC.

I haven’t powered anything on to run through the initial setup, but that’s mostly because I want to get the network configured first (I have diagrams drawn up for that part). I’m waiting on a few more cables to arrive later in the week, so until then the real network setup is on the back burner (at which point I’ll explain the “donated” equipment). However, I believe the SuperMicro servers and NVMe drives should be arriving before then, so I might set aside some time to get that hardware squared away as well.

alpha posting!

After many years resisting heavy technology investment and implementation at home, since it’s my day job, I’ll be undertaking some big projects. First and foremost, this newly redesigned site, and then I’ll be documenting the journey here.

Stay tuned! (Same Bat-time, same Bat-channel…)